1. Prepare the photographs and open BlendIt
A multiple exposure combines two or more photographs into one image. You might place a texture over a portrait, combine separate moments in a scene, or bring together the bright traces in a sequence of night-sky exposures. The result depends on both your source photographs and how each layer mixes with the image beneath it.
This workflow uses the BlendIt plugin for Lightroom Classic. It requires the desktop Classic application; Lightroom cloud and mobile are not supported. Follow the installation instructions for your platform before starting. Keep original source files online and available, rather than relying on missing originals or disconnected storage.
- Choose a small first project. Start with two images that have a clear relationship, such as a landscape and a cloud texture. A simpler stack makes it easier to see what each control changes.
- Make basic Develop adjustments. Set exposure and color in Lightroom before sending the images to BlendIt. Strongly clipped highlights or blocked shadows reduce the options available when blending.
- Select 2–50 photos in Library. Choose Library → Plug-in Extras → BlendIt to open the editor.
For a star-trail sequence, use frames captured from a fixed camera with consistent framing. BlendIt provides manual positioning; it does not automatically align the photographs. Misaligned foregrounds will remain visible even when the sky looks interesting.
2. Choose a blend mode for the result you want
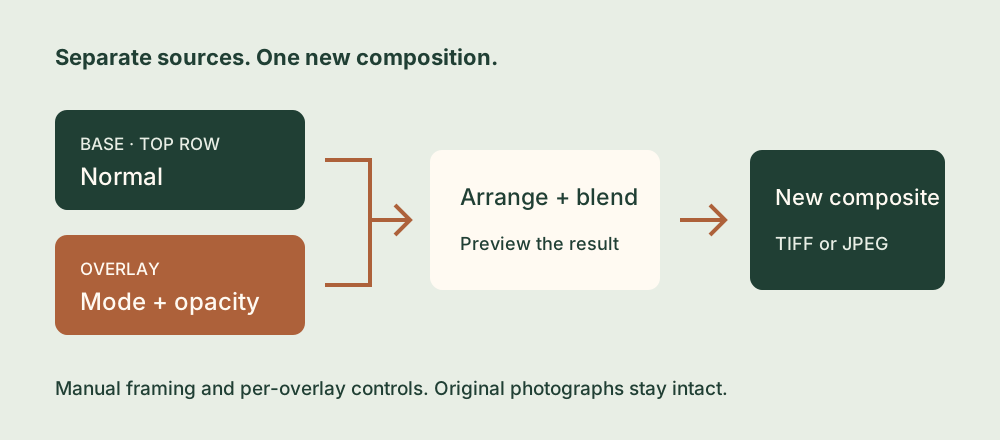
The base image is the top row in BlendIt's layer list and always uses Normal. Each overlay can have its own blend mode and opacity. Start with one overlay visible, select it, and compare these common modes:
| Mode | What it does | A useful starting point |
|---|---|---|
| Normal | Places the overlay over the existing image; opacity controls the mix. | A straightforward double exposure at reduced opacity. |
| Lighten | Keeps the brighter channel values from the images being combined. | Bright trails against a dark sky, provided frames are aligned. |
| Screen | Produces a lighter combination, with dark areas contributing less. | Luminous textures, light patterns, and a brighter layered look. |
| Multiply | Darkens the combination, with light areas contributing less. | Dark textures or a more subdued, graphic composition. |
These are starting points rather than fixed recipes. Try changing the order of the images, because an overlay's position changes what lies beneath it. Lower opacity if a texture overwhelms the subject. With several overlays, use the layer visibility controls to compare contributions one at a time.
3. Arrange the layers and refine the composition
Move the image you want as the base to the top row using the layer controls. Adjust an overlay's scale, rotation, horizontal or vertical position, or flips to place its main shapes where you want them. A portrait and a texture often work better when the texture follows the face's large shapes rather than covering every detail equally.
For groups, Shift-click selects a range; Command-click on Mac or Ctrl-click on Windows adds individual layers. Apply a common mode or opacity to the selected overlays when you want a consistent treatment, then refine a single layer afterward.
BlendIt also offers independent Auto Blend options for softening overlapping image boundaries and matching tones and colors. Begin with both off so you can judge the original layers. Enable edge softening when a visible overlap boundary distracts from the composition, or tone/color matching when an overlay needs to sit more comfortably with the composite beneath it.
Start with Lighten on the overlays and leave both Auto Blend options off. Inspect the foreground and bright objects as well as the sky. This workflow does not provide automatic alignment, focus stacking, HDR tone mapping, or noise-reduction stacking.
4. Save a new image and return to the catalog
Choose the destination folder and save as a 16-bit RGB TIFF or a JPEG. TIFF is a useful choice if you plan more tonal editing; JPEG is convenient for a smaller finished file. The plugin's current output uses sRGB and is limited to 12,000 pixels on the long edge and 60 megapixels.
Watch the save progress and wait for completion. BlendIt imports the finished image into Lightroom Classic. If you started from a regular collection, it also adds the result there. Your source photographs remain intact. Inspect the saved result at full size because the editor preview uses reduced resolution.
5. Fix common blending problems
- The result looks too bright: lower overlay opacity, compare Normal or Lighten with Screen, or reduce the source exposure in Lightroom before rebuilding the stack.
- Edges or foreground objects appear doubled: check framing and alignment. Use manual transforms for small corrections; choose better-matched source images when perspective differs.
- One image seems to disappear: check visibility, opacity, order, and mode. Lighten may contribute very little from a dark overlay.
- You have more than 50 frames: divide them into batches. Intermediate composites can change the result for some modes; compare a small test before processing the whole sequence.
- You cannot find the saved image: check the chosen destination and originating collection. The support guide explains saving and catalog behavior.
Once the workflow feels familiar, change one variable at a time and save a few versions. Comparing a restrained blend with a stronger one is often more useful than adding more source images.